
Downloading some themes for your Playstation Portable console sometimes didn't meet to your liking. Some icons may fit to the theme and the rest probably not. But, if you have some skills to create the icon for your theme creation then you can shape it like you want.
This tutorial only shares about how to create the icons for PTF formatted theme. If you understand the basic creating the icons then creating a complete Playstation Portable theme will be piece of cake.Creating the theme by yourself will need Sony Custom Theme Converter (any version is ok) and the 'readable' icons format for your Theme project.
Sony Custom Theme Converter actually is very picky for image format that can be read in that software , you must follow up their format which is not available to do in conventional image editing such as Adobe Photoshop.
The requirements format for creating PSP icon from Sony Custom Theme Converter is like this :
Category Icon
File : TGA/PNG/GIM (of course you can choose only one, but i recommend to choose png)
Image Size : 64 x 48
Format : 8 bit Index (32 bit color) image
First Level Icon
File : TGA/PNG/GIM (of course you can choose only one, but i recommend to choose png)
Image Size : 48 x 48
Format : 8 bit Index (32 bit color) image
Second Level Icon
File : TGA/PNG/GIM (of course you can choose only one, but i recommend to choose png)
Image Size : 32 x 32
Format : 8 bit Index (32 bit color) image
Preview Icon
File : TGA/PNG/GIM (of course you can choose only one, but i recommend to choose png)
Image Size : 16 x 16
Format : 8 bit Index (32 bit color) image
* Why PNG format ? well without doubt it has transparent feature so it will make a good shape for your icon.
* Only for first level icon and second level icon you need to create icon focus file (has the same format for each respective type of the icons), if you have the Sony Custom Theme Converter you can see or use the sample and perhaps you can figure out how to make the proper focus icon (since i'm not going to explained it at this time).
If you are using only Adobe Photoshop, there's no other option beside TGA format if you want to make your icon read-able in Sony Custom Theme Converter Software, but i will not recommend it to you since the quality is less than good.
The other option to make it works is you must have Adobe Illustrator (some people recommend it but i don't have that on my computer), buying or illegal downloading are not wise options , until i found something easier and actually free (don't worry because it's legal software).
First you must have either Adobe Photoshop (any CS) or Paint.net in your computer, if you have or more familiar with Adobe Photoshop then you must download Paint.net and install it into your computer but if you think you can do it with Paint.net then you don't need the Photoshop (in my case, I'm more familiar with Adobe Photoshop more than Paint.net so this tutorial will have some Adobe Photoshop in half progress and Paint.net on the rest half progress).
Assume that you already have the icon candidates for your new PTF themes in PNG format with resolution for Category icon/ First level Icon/ Second level Icon. Open your icon in Adobe Photoshop (you don't need to close then open again if actually you in the middle work for your icon )

click image > mode > indexed color, select yes and ok when the two notifications appear after you choose the indexed color. In this mode you can't move or drag your icon , so if you need some modification in your icon you must change the format into RGB color by click again image > mode > RGB color and after you satisfy with your latest modification you can change again into indexed color. After that, save as into png format (interlaced) your icon into your folder.
Open again your icon that you save into indexed color in Paint.net. Press Ctrl with S together to enter save as pop up, choose 8 bit and then click ok. If you follow this step correctly then your icon should be read-able in Sony Custom Theme Converter.


Some of my creation,
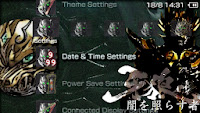
Garo Yami Wo Terasu Mono Theme

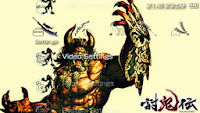
Toukiden Theme

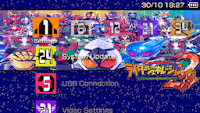
Kamen Rider Gaim & All Kamen Rider: Rider Generation 2 Theme

Additional
for the image format such as wallpaper & preview you will do the same method in order to make both of them can be read-able in Sony Custom Theme Converter. Just make sure the resolution for wallpaper is 480x272 and the preview is 300x170, then save as both of them as BMP format.


0 komentar:
Posting Komentar